Enginursday: A Little Car Hacking
Making a display for an ethanol sensor.
A buddy of mine is a real racing aficionado, constantly trying to squeeze every last bit of power out of his car - part of that effort includes mixing ethanol in with his gasoline. As it turns out, there's a sensor to help with that. It measures the amount of ethanol present in the fuel passing through it, and reports the output for use in vehicle tuning.
How It Works
The sensor is a very clever piece of engineering. To explain it, I'll have to bring in a little bit of physics - specifically how a capacitor is formed.
As shown in the image above, a capacitor at its simplest is two plates (of area A) separated by a distance (d) with some insulating material between them. The insulating material has a property called permittivity.
If, like me, you once had to take an advanced physics class, you might recognize this formula:
ε0 is the permittivity of free space, and εr is the relative permittivity of the material between the plates (the dielectric). A is the area of the plates, and r is the distance between the plates. Variations on this formula allow one to calculate the capacitance of many different orientations of plate/dielectric.
The ethanol sensor relies on the difference in permittivity between ethanol and gasoline to calculate how much ethanol is in the fuel flowing between two plates inside the sensor. Ethanol has something like five times the permittivity of gasoline, meaning the capacitance can vary significantly as more ethanol is added to the mix.
The Sensor Interface
The sensor itself runs on 12V, as do most automotive sensors. Its output is an open-drain signal that varies in frequency with ethanol percentage: 50Hz for 0 percent ethanol, and 150Hz for 100 percent ethanol. It also reports the temperature of the fuel by varying the pulse width of the signal, but we won't worry about that here.
The Electronics
Since the output signal is open-drain, we can connect it directly to a pin on a microcontroller, despite the fact that the sensor is a 12V device. This makes the sensor interface simple.
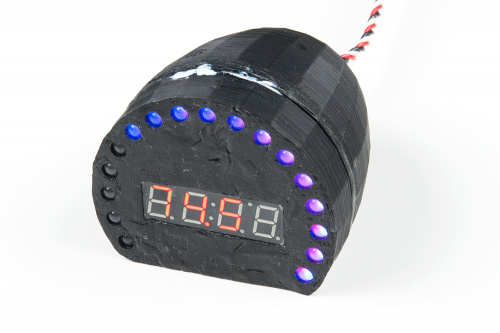
To provide feedback to the user, I attached one of our Serial Controlled 7-Segment Displays. A ring of Addressable 5mm LEDs around the outside edge provides a quick visual of where the mix is. The entire thing is driven by a SAMD21 Mini Breakout.
Power is supplied through a standard 7805 Voltage Regulator. Getting the 12V to the regulator was interesting, and was solved by a little gadget I'd never seen before (but my car-oriented buddy is apparently very familiar with) called an add-a-fuse. Providing a negative return is a lot easier, because you just find a screw and run a wire to that -- the entire operation uses the car's chassis as the current return path. For some reason this really bothers me.
The Final Product
We spent some time this past Saturday with my friend's car in the SparkFun garage, and I'm happy to say that my gizmo works as planned!
I still have to install it in the car; it's going in the glove box since it's not a mission critical gauge that needs to be constantly monitored.
As I was doing this write up, it occurred to me that it would've been easier to do this as a wireless project, using a Simblee board to provide an interface on a smartphone rather than passing a wire through the firewall. Oh well. There's always the next hack!


