Welcoming Our New Robot Friends :: Part II
The second installment of a somewhat long story about the recent additions to our growing family of manufacturing equipment.
If you read last week's post about our new pick-and-place machine, you likely, at some point, said to yourself, “SparkFun’s new pick-and-place machine sure doesn’t look or sound like a bootstrapped solution.” And that would be a fair assessment. But where we ventured into a more stable and proven (read “somewhat expensive”) equipment investment for populating our PCBs, we simultaneously added a very different and new type of equipment to our lineup that very much met our bootstrapped criteria.
While we were exploring new pick-and-place machines, we also began to realize that a new machine would quickly outpace our ability to hand-stencil PCBs which, until this fall, had been our exclusive method for adding solder paste to the approximately 2 million circuit boards that we have personally built here in Boulder. Unless we found a way to increase our stenciling speed and capacity, the speed of our new pick-and-place machine is so great that it would result in that machine sitting idle for long stretches of time while our hand stenciling process played catch up. Not to toot our own horn, but our board assemblers have developed into quite impressive machine-like PCB stencilers over the years (read "toot toot!"). But even as awesome as we are, we simply cannot keep up with the rated 16,000CPH speed of our new MYDATA pick-and-place machine.
Our new pick-and-place machine is capable of populating, in a single operational cycle, 6 times more square inches of PCB real estate than our older machines (306 sq. inches vs. 50 sq. inches, approximately). However, we knew that the largest PCB panels we could consistently stencil by hand maxed out at around 6 x 6 inches. So we decided that the time had come for us to explore the world of automated and semi-automated stencil printers.
-> 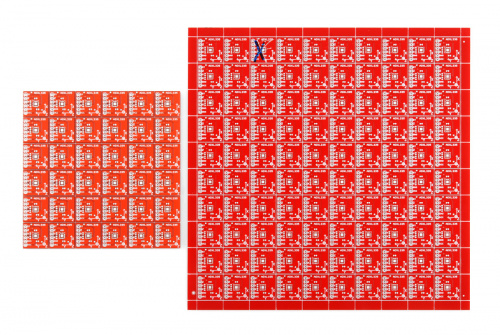
The ADXL335 PCB panel size has increased from 36 to 100 boards. <-
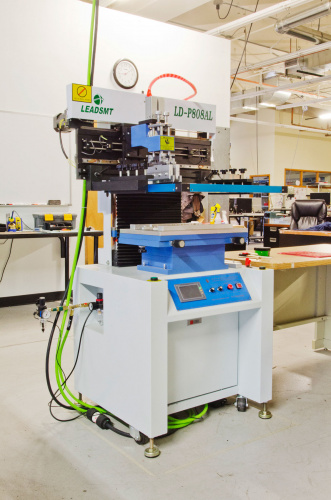
A stencil printer is a fairly simple machine that applies solder paste to circuit boards, just like we have done by hand here for many years. However, upgrading to machine stenciling takes advantage of the increased pressure and improved pressure consistency that can be applied to a stencil and PCB panel via a pneumatic pressure system. For reference, we took a really rough measurement and found out that we typically deliver 6-8 pounds of downward pressure when stenciling by hand. And our new stencil printer delivered a consistent 32 pounds of downward pressure when activated. So, with the right setup and controls, a stencil printer can evenly disperse that pressure across a longer blade, holding that same pressure consistently throughout the entire paste stenciling swipe. Because of this, stencil printers can then be designed to accommodate larger PCBs or PCB panels for increased production efficiencies.
-> 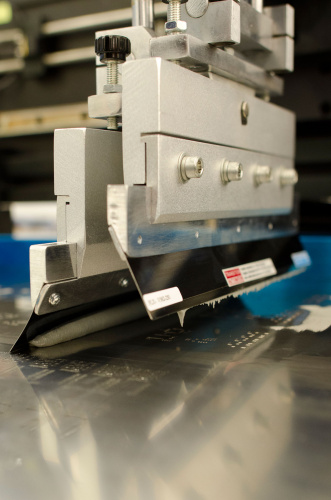
A bead of solder paste in mid-swipe. <-
At the first of this year we were introduced to the DEK Horizon iX stencil printers and were blown away by the level of detail in their design. Needless to say, we wanted one as soon as we saw them in action. And we went so far as to have some large panel PCBs built up for us that we took out to San Jose so that we could see them stenciled in person at one of DEK’s engineering facilities. These in-person tests impressed us and we learned a great deal about how stencil printers work while watching the DEK experts set up and stencil our boards on a Horizon iX.
However, while I was out on the west coast to visit DEK, I also drove up to Sacramento to take a tour of Parallax. While visiting with them, they told me about some entry-level stencil printers that they had seen being used on a recent visit to Shenzhen and felt that they were sufficient for the level of PCB designs being built by the likes of SparkFun, Parallax, Adafruit, etc. So I returned to Boulder with a stencil printing alternative to research.
After a good bit of digging, we found a manufacturer in Shenzhen that was able to answer some of our questions. The rep that we communicated with did a fine job of sharing with us all of the info she had but the documentation that we were sent certainly left a lot to be desired. However, it was clear early on that, buying a lesser sophisticated stencil printer from Shenzhen was going to be worth the risk, primarily for the initial cost savings over machines being sold by other manufacturers with sales offices here in The States. This one would come with far fewer of the high-end features that are mostly standard on the DEK machines and others like them, but we believed that we could live without those luxuries for now. And knowing that we would be learning a great deal about stencil printing by simply introducing a stencil printer, any stencil printer, into our process, we ultimately opted for the less expensive yet more unpredictable printer.
ReplaceMeOpen
ReplaceMeClose
This might not come as a surprise to some of you, but our stencil printer did not function as it was supposed to upon arrival. For starters, it was not packed well inside its shipping crate and arrived on our docks with a damaged motor after not being transported upright during shipping. However, the company quickly sent us a new motor which we replaced, with the help of Paul, our onsite mech-e expert. But then, after powering it up for the first time, we discovered that some of the wiring had been done in reverse so we pulled out our multimeters, did some troubleshooting, and then rewired it correctly. Oh, and did I mention that we received no schematics for the stencil printer? So there was a lot of trial & error going on!
But once we saw that both the mechanical and electronic systems of the machine were functioning as they were designed to, we turned our focus onto ordering larger PCB panels and the stencils (also known as foils) to go with them. Since that time, we have gradually begun transitioning our highest volume PCB designs over to this new stenciling process. And to date, it has been a great upgrade for us.
We did learn, however, that our new stencil printer didn't provide a very efficient means of lining up the foil to the paste-free PCB panel. As noted earlier, higher end stencil printers come equipped with many features that our new machine did not. One of those features is a vision-alignment system that, once programmed, ensures near perfect stencil-to-PCB panel alignment every time a fresh new PCB panel is loaded into the machine. Our printer utilizes a series of knobs to manually adjust the stencil in the X, Y, and Theta directions. But these adjustments can really only be made when the stencil is already laying directly on top of the PCB. Unfortunately, the fastest way to join the stencil and PCB together, after you had the machine set up, was to initiate the print sequence which provided only about 1 full second between the time that the foil and the PCB connected and the blade of the printer began its swipe. As you might've guessed, that is barely even enough time to even find out where the alignment is off, much less to be able to make the necessary adjustments.
So we decided to hack on our stencil printer and install an interrupt switch that, effectively, released the pressure of the head unit and dropped the foil onto the bare PCB without actually initiating the print sequence. This allowed us to take all the time that we needed to make the necessary alignment adjustments before printing. The switch would then be released to return the head unit to its default position. And then, once we were assured of a solid alignment, we could begin the full print through the machine's touch-screen interface.
-> 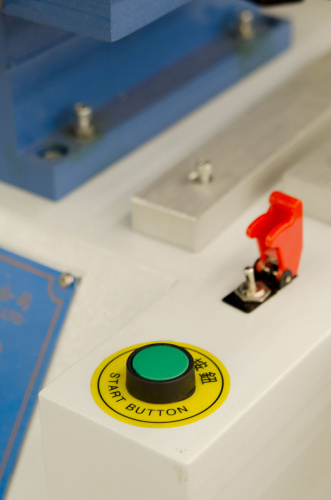
Hacking = problem solving. <-
Our stencil printing improvement adventure is ongoing. We feel confident in the printing results we are seeing and are now working through the challenges associated with transitioning our designs from small to large PCB panel sizes. It has definitely been a great learning experience so far. And we are excited to see how much increased production capacity we will see as we begin to fully take advantage of the capabilities of both our new stencil printer and pick-and-place machine! If you have any questions about stencil printing or about either of our two new robotic friends, please ask ask them by posting a comment below...
