Engineer Thursday - Artistic PCBs in Eagle
Tips and tricks to turn your drab PCB design into a snazzy work of art!
Printed circuit board (PCB) layout is one of the best parts of the project design process. Drawing up schematics, laying out components, and solving the net-routing-puzzle are all fun, oddly relaxing tasks, but my favorite part of PCB design is making them look snazzy. It's as close as this engineer will get to making "art."
We do all of our PCB design in Eagle, and we host tutorials, libraries, and classes to help encourage everyone to get their hands on the software and design their own PCB. In my Engineer Thursday blog post I wanted to share some of the PCB art tricks I've discovered through the years of working with Eagle. Hopefully this'll inspire others to have some extra fun with their PCB designs!
Consider the Color Palette
PCB design leaves you with a rather limited color palette: three, maybe four colors to choose from. There's the soldermask, which can be traditional green or (depending on what the fab house can do) SparkFun red, LilyPad/OSH Park purple, Arduino blue, black, yellow, white, orange, or even clear. You'll have two shades of the soldermask to work with: a lighter shade when there's copper underneath, and a darker shade when it's just FR-4 below.
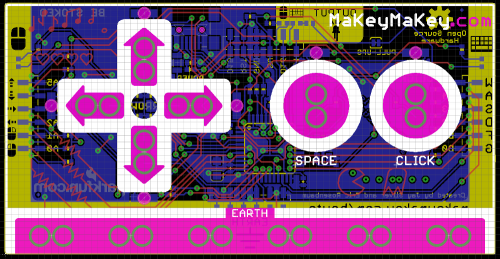
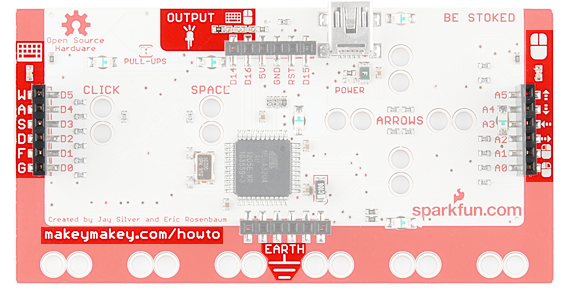
Another, often unused color in your palette is the exposed metal. The color of the metal depends on what you ask for from the fab house. It'll be either silver, copper, or gold. The bare metal can be out of necessity (like the arrow keys on the MaKey MaKey), or completely removed from any net in the schematic (like the ".com" on the top side). In Eagle, to expose metal, you need a layer of copper (top or bottom), with a matching stop layer (tStop or bStop) over that.
Finally, of course, there's silkscreen. Traditionally silk is white, but (again, depending on the fab house) there's also red, blue, yellow, and black. It's even possible to get two different colors of silk on a board. Usually non-white silk colors are an up-charge, but it might be worth it to get the cool-factor you're looking for.
In designing the MaKey MaKey, we tried to make the most of our color palette. There are big blocks of red silk around the borders, carefully exposed white soldermask within the silk, circles and arrows of exposed silver, and little greyish-yellow (soldermask-covered copper) music notes. All painstakingly drawn and layered using Eagle, with the help of a few extra tools.
Eagle Tools
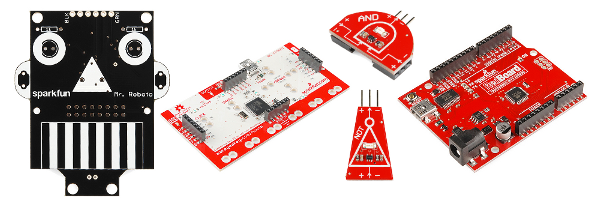
If you've fiddled around with Eagle, you probably know Eagle provides a limited set of tools for drawing basic shapes: the wire tool can draw lines, there's circle and arc drawing tools, and there are the polygon and rectangle tools for drawing big blocks on a layer. The polygon tool is the most versatile of the bunch, you can continue to add vertexes until you've got just the shape you need. That's the tool used to draw the silkscreen around the arrows on the MaKey MaKey, or the funky silkscreen shapes on Mr. Roboto's ears.
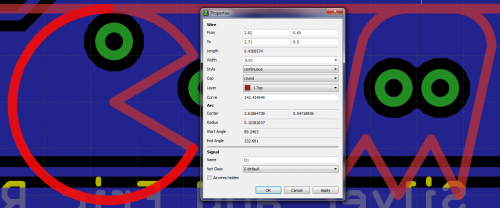
Once you've drawn an element out, you can always go back in there with the Info tool to manually adjust coordinates, widths, curves, and sizes.
For anything more complicated than basic shapes, though, you can import images using the bitmap import tool.
Import Bitmap
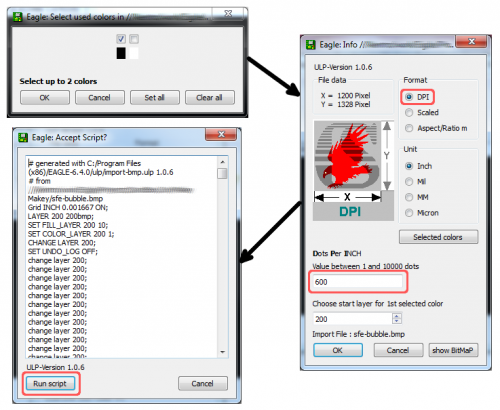
The import bitmap tool comes with all Eagle installs. Run it by going to File>Run ULP... and selecting import-bmp.ulp. Then select a bitmap (.bmp) file you'd like to import. Massage your bitmap before importing it, get rid of white space on the edges and save it into a monochrome format. That's ultimately what you're left with when it's imported onto a PCB: black or white, silk or no silk.
I use the (dots per inch) format when importing a bitmap. Measure out how big you want the image to physically be on the board, then divide that into the image's pixel-width.
Place the image on an unused layer (like the 200 it defaults to), later you can Group it, and use the Change > Layer... tool to get it on the layer you need. Once you've got the scaling and layers set, OK that thing, and run the script it generates. It may take a few tries to get the image perfectly sized.
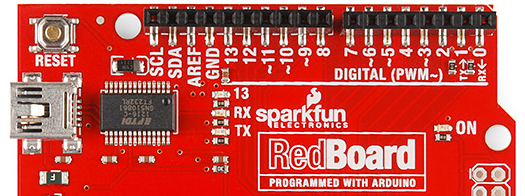
You can even use the import bitmap tool to add custom fonts, if you're not happy with either of the boring ones Eagle provides. This is what we did for the labels on the RedBoard:
Negative Silkscreen
One of the coolest effects you can add to your PCB design is inverse, or negative silkscreen. You can see this in action on the backside of an Arduino or in select sections of the MaKey MaKey.
There's no layer in Eagle that says "don't put silk here," so doing negative silk takes a little extra work. Fortunately, among a huge list of user-submitted scripts in CadSoft's database, there is a ULP called negasilk. It takes some experimentation to get right (check the negasilk.ulp file for full directions), but the result is well worth it. Silkscreen has a really nice, soft, shiny look to it, and it looks especially great in large chunks.
Final Checks
Finally, I like to get a good model of what my board is going to look like before I order it. Eagle can only get you so far...you can turn off all bottom layers or top layers at once to get an idea of what each side looks like, but it's still hard to visualize. My favorite tool for modeling an Eagle design is EagleUp.
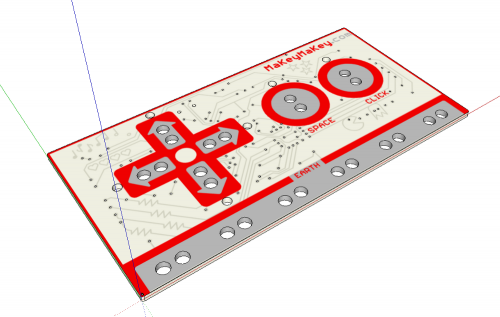
EagleUp is a really well done ULP/Sketchup plugin combo, which can get you a 3D model of your entire design (provided you have 3D models of every component...we're working on that, you can help!). It's great for visualizing just the PCB too; with minimal effort, you can get an accurate model like this:
Pretty close to the real thing! With that you can go back and change whatever looks funny, or pull the trigger and send your gerbers off to the fab house. Woo!
What About You?
I'd love to hear about what secrets you've gleaned. Anything I've missed? Care to share some of your PCB artwork? We do all of our PCB design in Eagle, so forgive me for ignoring some of the other great design tools out there. Do any of those make PCB art easier?
