SparkFun's Rapid Prototyping Lab (Part III)
In this final installment, we talk about the completed workspace from parts I and II
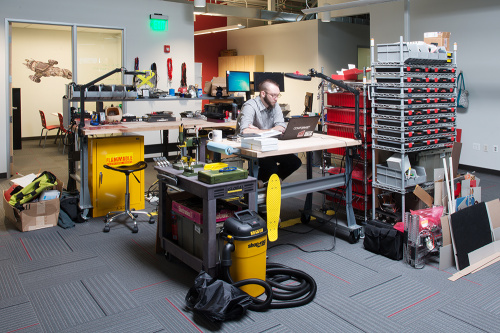
In Part I of this series, we discussed some of my inspirations for workspace organization and theory. In Part II we talked about where to buy stuff. Finally, today, I'm going to give you the tour of what I ended up with and how it has been laid out.
Big Bench
The 96" workbench became the main staging area for projects in the lab. My computer workstation is bolted to one side of the bench so that I can quickly reference schematics and pictures while I'm working. On the other side of the bench, I've created a soldering area by putting down a silicone mat and attaching one of the magnifying lamps. A soldering iron and hot air rework station stay plugged in by the mat so that they're always ready to go.
There's also a riser that runs the full length of the workbench where larger and more frequently used parts and tools are stored in stackable shelf bins. Because the lab also acts as a backdrop for video content and a stop on our office tours, I also use this space to display working demos!
Little Bench
The 48" bench has become the hardest working space in the lab. The only things that live on this bench permanently are a magnifying lamp and a shop towel dispenser. The bench also has an easily accessible power outlet. The idea was to have a work surface that would remain completely clean unless it was in use. So far, it's been a great success! One way I'm keeping this space clean is by moving projects that are in progress, but not being actively hacked on, into a project bin...
Project Bins
A rolling wire rack with 7 plastic tubs works as a rotating storage space for builds in progress. All materials associated with a given project live in the bin until the project is completed.
These tubs are unfortunately useful for a ton of different things... And they've become a sort of catch-all in the short time since their implementation. It will ultimately fall on me to ensure that these bins are used correctly. But they're very handy in theory.
Parts Bins
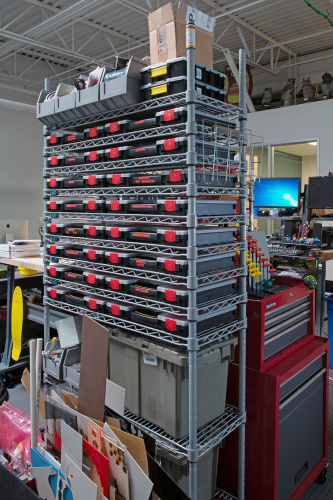
Glorious, Beautiful, Logical. The parts bins are my pride and joy. Sixteen plastic organizers are individually labeled and categorized. These organizers are stacked on a wire shelf so that they can be quickly browsed and individually removed and replaced without bothering the rest of the stack. The same wire shelf houses a few distribution bins for larger parts as well as stackable bins for things like heavy hardware and wire.
Tool Chest
Hand tools like screwdrivers, wire strippers, and hammers live in the tool chest. When a tool isn't actively being used, it should be findable here. I've cut some foam to the size of the drawers in order to make dedicated spaces for each tool. Dedicated spaces ensure that each tool is findable and also make it easy to identify missing tools.
Fab Cart
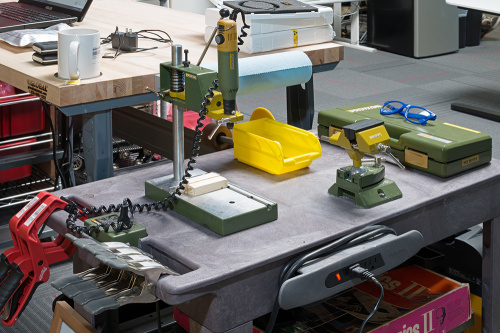
One of my rolling plastic carts has been dedicated to fabricating small parts. The rotary tool lives there with the drill press and a precision vise. Since this cart generates the most dust, it also houses a ShopVac for quick cleanup.
Travel Cart
This rolling cart is a general purpose cart for doing demo work around the building, since part of what I do is installing and maintaining publicly displayed demo projects. Nothing should live on this cart permanently, it's just a utility cart.
How Is It Working So Far?
Everything is still floating around and finding its place in my process. But for the most part, everything is serving the purpose that I intended. Shocking, I know... One thing I've noticed is that the best planning you can do is to plan for change. You won't be able to predict perfectly what you need in your space, or where it should be. What you can do, however, is to make your shop flexible. A small example from my experience? The soldering iron originally lived on the big workbench but I found myself doing more soldering on the small workbench so I rearranged some things and made it easy to swap back and forth. Bottom line: Plan the best you can, and plan to change the plan.
If you have any questions, or want to share pictures of your shop, please leave a comment! I can't wait to hear from you!
