Baby Blynk Monitor Thing
Baby sleep pattern monitor utilizing the SparkFun ESP8266 Thing, Blynk app, and SparkFun ADXL345 Library
With the release of the revamped SparkFun ADXL345 Hookup Guide, it seemed like a good time to do a project utilizing the new SparkFun ADXL345 Library. Now, feel free to yell at me for a moment...
"Elizabeth, the title of this post says Baby Blynk, not ADXL345. And it's a Thing?! Why thing? Were you too lazy to call it a device?!"
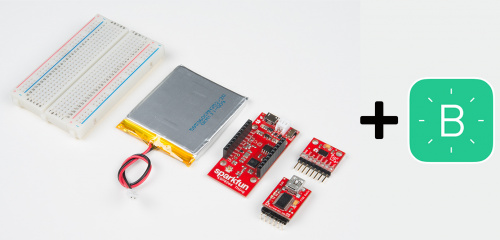
No, no, no... you have it all wrong, I swear! I utilize the Blynk app, SparkFun ESP8266 Thing, SparkFun Triple Axis Accelerometer ADXL345 and SparkFun ADXL345 Library to create a nice little IoT project to monitor a baby's sleeping pattern.
Something rather exciting here at the SparkFun family is that we are expecting some new additions soon! So to celebrate just that, I bring to the expecting parents the BABY BLYNK MONITOR THING!
OK, I must confess... there is a little bit of selfishness to this creation. Recently, my husband and I took down one of the sides of our daughter's crib. It's low enough to the ground and has been really great at preparing her to transition to a full bed. The past couple weeks have been a bit crazy. She gets up in the middle of the night, plays in her room and puts herself back to bed. This got me curious as to how many times she actually does this. Also, how long has she been awake for?! As a Mom, I WANT TO KNOW THESE THINGS!
My Process to Developing Baby Blynk Monitor Thing
Step 1: ADXL345 communication to the SparkFun ESP8266 Thing
I could have very easily used the Blynk board, since it would have also supported my accelerometer's I2C connection, but the size of the Thing made it ideal for my application. All that was attached to the SparkFun ESP8266 Thing was a Lithium Ion Battery and the SparkFun ADXL345 Accelerometer via I2C pins. Also, something great about the SparkFun ESP8266 Thing is that you can actually program the dang Thing (you see what I did there) through the Arduino IDE by installing the ESP8266 Arduino Addon. The ESP8266 Thing Hookup Guide is actually a great reference for this.
Step 2: Integrate Blynk code into sketch
Did you know the ESP8266 Thing can connect to the Blynk App?! Yay! I was able to utilize the BlynkSimpleEsp8266 Library. If you're curious how I integrated all these components into a sketch, I actually added my Baby Blynk Monitor Thing code to the SparkFun ADXL345 Library Repo on GitHub. You'll find it in the examples folder.
Step 3: Create the app
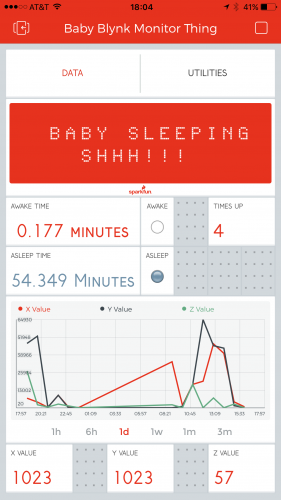
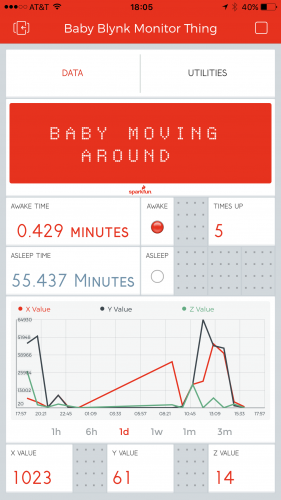
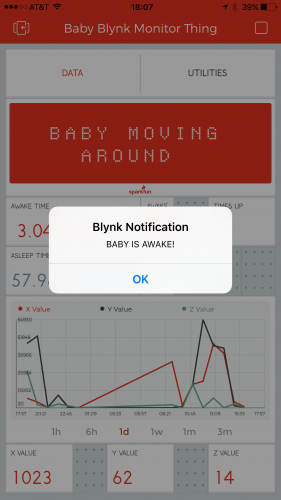
The Blynk app is both iOS- and Android-compatible. The monitor has the ability to communicate with the SparkFun ESP8266 Thing, reading data from the SparkFun Triple Axis Accelerometer ADXL345. With this data, I was able to customize the application to monitor and report back the following to my smartphone:
- How long the baby has been sleeping/awake
- How many times the baby has gotten up
- Accelerometer XYZ-axis values with History Graph
- Send a notification when the baby has been awake for more than three minutes
Step 4: Prototype enclosure
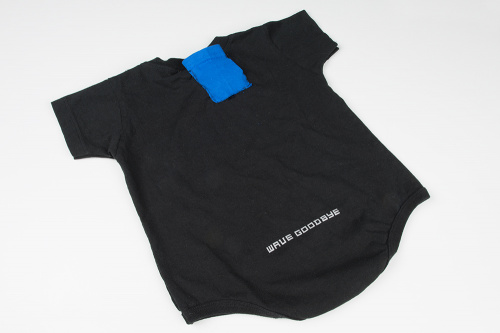
Yes, something to hold my electronics -- baby onesie to the rescue! I sewed a small piece of fabric to the back of my daughter's onesie to hold the hardware. The battery, Thing board and accelerometer were only a little more than a quarter-inch thick. She always sleeps on her stomach, so this seemed like the perfect location. I also had enough room to cushion either side of the board. Once the hardware was inserted into the pocket, everything fit really snug, but just as a precaution I added a few stitches at the top as well to make sure all sides were securely enclosed. Let's just hope I don't have a Hulk baby!
Testing Phase
Just a little side note: What definitely brought this project to life was the Nine Inch Nails onesie. C'mon now, you know it's true! OK, I won't force it on you. As you were. (¬‿¬)
So as soon as nap time came around, I sprang to my feet in excitement! YES! Time to set up the Baby Blynk Monitor Thing. I swear I just like to say it. Honestly, I found the Blynk App was really useful to have on hand. It let me know how long the baby had been asleep for...
It told me how long she had been awake for and how many times she had woken up during nap time...
And finally, when she had been awake for three minutes or longer it sent me a push notification to go get her...
Feel free to scan the QR Code to clone this Blynk project to your device!
Final Thoughts
I was really happy with how this turned out. Although I had no problems during my nap time test, the next step I would take to make the device safer would be to implement the ESP8266 Thing Sleep Mode function. This way I could have the device cycle ON and OFF throughout the night. Also, finding a way to better package the device -- whether it be around the torso, leg or ankle. We could even take the application a step further and monitor the baby's heart rate and breathing.
But don't limit yourself there. Explore what other applications you can develop with this setup! Enjoy. \(^-^)/
