T³: Programming an ATtiny84A from Arduino
How to set up an Arduino as an in-system programmer (ISP) and program an Atmel ATtiny84A to blink
I'm currently working on a project that requires a cheap, low-power microcontroller that's programmable through Arduino and has a few more pins than the ATtiny85. That's where I found the ATtiny84A. It has many of the same features as the ATtiny85, but has 12 I/O pins instead of six.
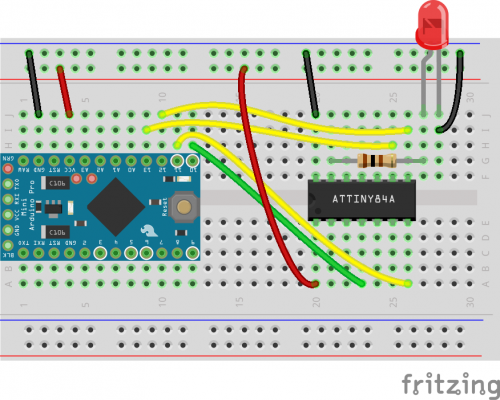
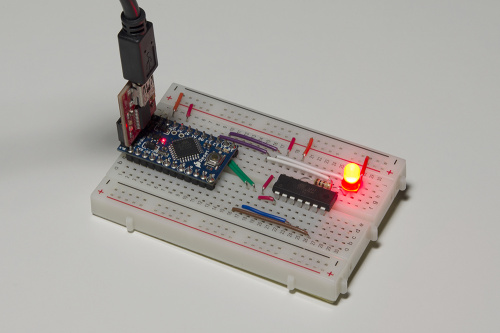
As it turns out, a lot of work has already been done to program ATtiny microcontrollers from Arduino, which makes this pretty easy. To start, connect an Arduino (UNO, etc.) to the ATtiny84A using the Arduino as ISP configuration. I'll be using a 3.3V Arduino Pro Mini to keep everything nice and tidy on a breadboard.
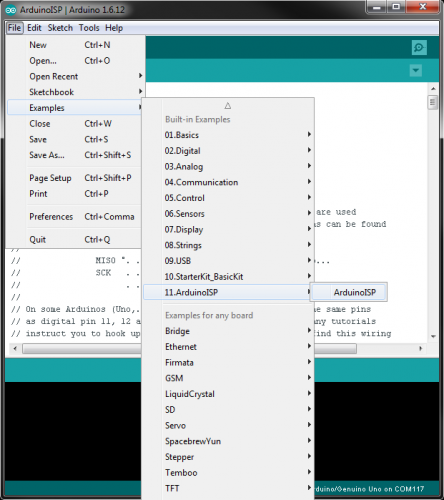
Connect the Arduino to your computer, open the Arduino IDE and select File > Examples > 11.ArduinoISP > ArduinoISP.
Select your Board from Tools (Arduino Pro Mini 3.3V in this case), choose the serial port and upload the ISP sketch to the Arduino. Note that in this first step, we're programming the Arduino to act as an in-system programmer (ISP), which we'll use to send compiled programs to our target microcontroller (ATtiny84A).
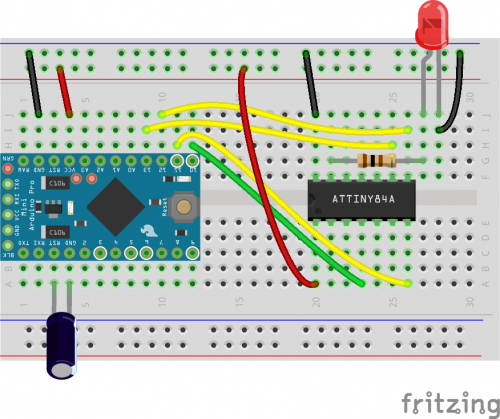
Once you have uploaded the ISP sketch, place a 10μF capacitor across RESET and GND of the Arduino board (watch the polarity – for electrolytic and tantalum capacitors, make sure the side with negative markings, "-", is connected to GND). Many Arduino boards are configured to reset when avrdude (the tool that Arduino uses to upload code to Atmel AVR microcontrollers) begins communication across the serial line. We can prevent that from happening by adding the capacitor.
At this point, we have the Arduino configured as a programmer for the ATtiny. Now, to program the ATtiny from the Arduino IDE, we need to include some custom board definitions. Luckily, GitHub user damellis has already created them for us (specifically for the ATtiny24/44/84 and ATtiny25/45/85). All we have to do is include them in our IDE.
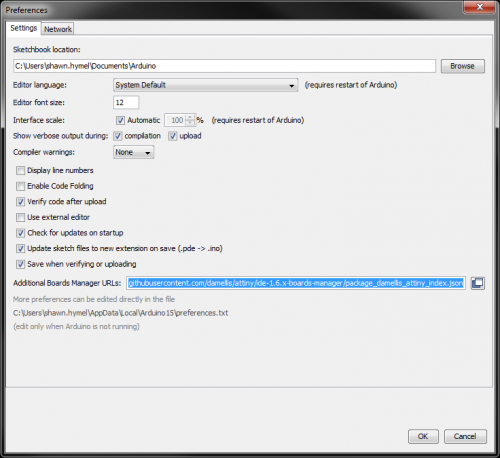
In File > Preferences, paste the following URL into Additional Boards Manager URLs.
https://raw.githubusercontent.com/damellis/attiny/ide-1.6.x-boards-manager/package_damellis_attiny_index.json
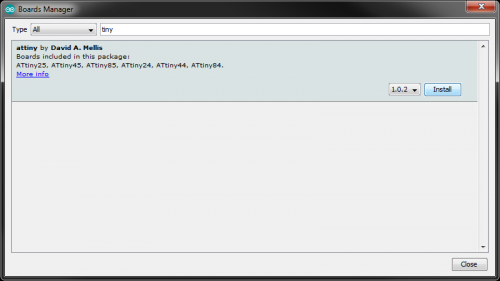
In Tools > Board > Boards Manager..., search for "tiny" and install the attiny boards' definitions.
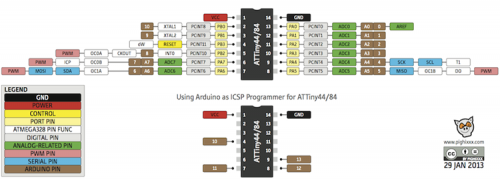
We can finally write some code for the ATtiny! Open a new Arduino sketch and copy in the following. Note that we connected the LED to pin 13, which is PA0, and corresponds to D0 in Arduino code (see the pinout diagram below).
const int led = 0;

void setup() {
  pinMode(led, OUTPUT);
}

void loop() {
  digitalWrite(led, HIGH);
  delay(500);
  digitalWrite(led, LOW);
  delay(500);
}
In case you were wondering how PA0 on the ATtiny84A matches with D0 on the Arduino, here is a diagram that will help:
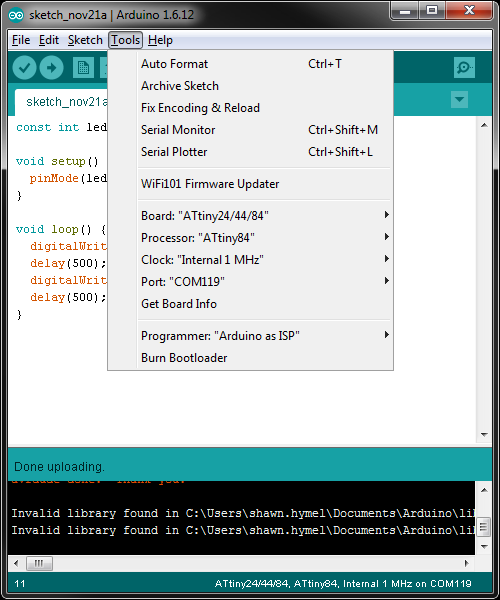
Under Tools, select the following to make the ATtiny84A the target platform:
- Board: ATtiny24/44/84
- Processor: ATtiny84
- Clock: Internal 1 MHz
- Port: \
Upload the sketch, and you should be greeted by a beautiful blinking LED!
For more information on programming with ATtiny microcontrollers, check out these tutorials:
