Enginursday: Pressing Our Buttons
A Cherry MX keyboard for Eagle shortcut keys
Eagle has been our go-to CAD program for quite a few years now, and while it's relatively easy to learn and use, I've always struggled to learn the keyboard shortcuts. Some of the other engineers here use the shortcuts quite regularly, and have created their own shortcut keys using the modifier keys (CTRL+ and ALT+), but I've always found it faster to just move my mouse over and use the left control menu.
That changed this week, when I decided to make a Cherry MX keyboard to handle shortcut keys. The keyboard has 16 Cherry MX switches and two rotary encoders. The keyboard uses a Pro Micro to read the switches and encoders, and because the Pro Micro has native USB, we can use it to tell the computer that it is a USB keyboard device. The project only requires two libraries: the HID library, which is based off of Arduino's mouse and keyboard libraries, and the Teensy encoder library.
How Does It Work?
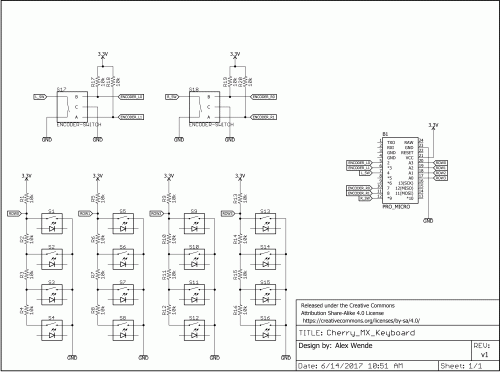
Let's start off by looking at the schematic:
The Pro Micro doesn't have enough IO pins to handle 16 switches and two encoders, so I first had to figure out a way to multiplex the switches. One of the easiest (and cheapest) ways I've found to do this is to create a voltage divider. By having each of the normally open switches connected to the voltage divider and ground, I'm able to use an analog pin to read the voltage and decide which switch was pressed in the row.
One of the problems I ran into while working with Arduino's keyboard library was the lack of support with multimedia control. The multimedia keys control things like play/pause, next/previous and volume. Thankfully someone already created a library to expand Arduino's library to include the media controls, which I attached to the left encoder using the functions Consumer.write(MEDIA_VOL_UP), Consumer.write(MEDIA_VOL_DOWN), and Consumer.write(MEDIA_VOLUME_MUTE).
Sending keyboard commands is really easy to do too. Sending a string of text is done the same as printing a message on the serial window, except instead of using the Serial class, you change the class to Keyboard. Because Eagle has a command line interface, I was able to print the commands directly to the command line. In other programs where you only have access to shortcut keys, you can still use modifier keys (i.e., Ctrl+ and Alt+) by using Keyboard.press() and Keyboard.release() or Keyboard.releaseAll().
How Well Does It Work?
Better than I thought, actually! When I designed the schematic, I primarily used the extra keyboard, and aside from having to look down to see what key I needed, I got used to it pretty easily and made the schematic design go by pretty quickly. For a quick demonstration, check out the video below.
Want to make one yourself? I've put all of my designs on GitHub, along with links to all the resources I used. The only request I have is that you share some photos and let me know what you use it for, or what improvements you make. A link to the repo, along with a wishlist, is provided below.


