Enginursday: Digging into the Werkstatt
Drive the Moog Werkstatt-01 with the SparkPunk sequencer, and starting in on a MIDI-to-CV converter.
Those of you watching SparkFun carefully noticed that we quietly introduced the Moog Werkstatt-01 analog synthesizer and add-on kit earlier this week.
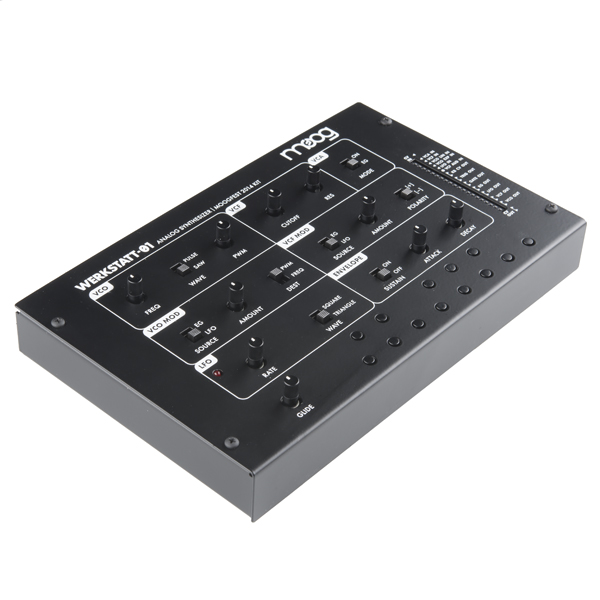
The Moog Werkstatt-01 is a one-oscillator analog synthesizer based on classic Moog designs. In a steel chassis that's a little larger than a VHS tape, it's got an oscillator, lowpass filter, modulators, a one octave keyboard, and a little pin header for patching and expanding the circuit. It's sold as a kit - the PCB is preassembled, but you populate the caps on the button switches, and seal it up in the enclosure.
When Moog approached us about producing the add-on parts kit, I certainly wasn't expecting it. I hadn't been paying careful attention - I didn't know that they'd introduced this little synth in workshops at Moogfest. They sent a sample unit and I started looking over the schematics they had published. Playing with the unit confirmed that the heart of the Moog sound was there - the discrete transistor ladder lowpass filter (schematic page 4), and it sounds like I remember it. While it's not as full featured as a Minimoog, I can still try to peck out "Lucky Man" on the octave of tact switches (Yes, yes, I know. More about this further down the page!).
They have also released lessons and modification projects, and other people are also starting to modify it. They are hosting the tutorials and modifications at werkstattworkshop.com.
Coming Back To My Origin
As Moog say on the website:
Analog synthesizers have long had their own maker culture born of curious engineers, physicists and hobbyists who have created and crafted their sounds through electronic experimentation.
Which is quite true in my case. Synthesizers and guitar pedals were my gateway into electronics.
Craig Anderton's Electronic Projects For Musicians really got me interested, demystified the basics, and gave me a foundation as I started taking engineering classes. From there I moved up to Paia kits, and built a Fatman synth. My interest in embedded computing was cemented when I dissected the 8031 assembly language firmware for the Fatman. The painful, minutely detailed detailed computer architecture stuff I was studying in school actually had applications in the real world!
Introducing Some Mods
At Werkstatt Workshop, Moog are presenting a handful of experiments, and are looking to foster the community around the Werkstatt. So with that, here are my first couple of contributions, which add some SparkFun hardware to the Werkstatt.
Terminology
Before we get into modifying the Werkstatt, let's explore a couple of terms that most synth-freaks already know, but other people might not. These describe signals used in analog synthesizers.
CV or Control Voltage - Analog systhesizers use analog voltages to control sonic parameters - the exact meaning of the voltage depends on the circuit. A few of the notable circuits include (each of which is present on the Werkstatt-01):
Voltage Controlled Oscillators (VCOs): these convert the control voltage into periodic waveforms. The frequency of the waveform corresponds to the input voltage. The Werkstatt follows the convention that a one volt increase corresponds to a one octave increase in pitch.
Voltage Controlled Filters (VCFs): change the timbre of the VCO output. The VCF in the Werkstatt is a lowpass filter, which removes the high frequencies from the signal.
Voltage controlled Amplifiers (VCAs): change out amplitude of the signal. A higher input voltage usually results in a higher amplitude output. These circuits are actually more frequently used as attenuators, reducing the amplitude to stop the sound when things should be silent.
Gate - The Gate is a binary signal that indicates a key is being held down - on the Werkstatt, the gate is 0V when no keys are held, and 5V when a key is held. The gate is used to trigger the envelope generator (EG).
It's also worth noting that control voltage isn't 100% standard from synth to synth. They don't always use the same voltage ranges, or signals. It's best to check the documentation when you're working with CV circuits.
Prerequisite
Both of these modifications use external circuits to drive the gate input of the Werkstatt. The stock Werkstatt doesn't have a gate input, but some clever users have already sorted out how to add one.
The user Red at the Moog Forum simply spliced the jack inline, while Laurentide Synthworks added an op-amp buffer on the input. I opted to take a cavalier option and skip the op-amp - but I'm also equipped to replace the hex inverter if I kill it.
The Laurentide and Red mods are similar, and both require a switching or normaling jack for the gate input. The switching feature is useful, as it allows the gate from the internal keyboard to be used when nothing is connected, or overridden when an external signal is patched in.
I used the following parts for my gate input.
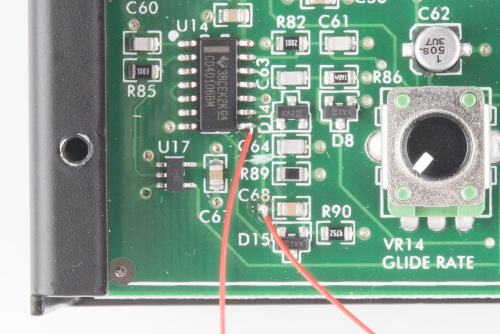
The PCB work for the mod looked like this
Pin 8 of IC14 (at the lower right corner) is the gate output from the keyboard circuit. I cut the trace coming from it between the silkscreen legends for C64 and R89. The trace is really skinny, and I needed some reasonably points that I could solder to. The leg of the IC was good for the gate output, which I ran to the TSH pad on the breakout. The gate input came from the TIP pad on the breakout, and returned to the via near the end of C68.
In hindsight, I should have used two different colors of wire, to make them easier to tell apart.
Sequencer
An obvious jumping-off point for modding the Werkstatt is to tie it to the SparkPunk Sequencer. The sequencer already generates control voltage and gate signals, we just need to adjust them to interface with the Werkstatt.
The Sequencer uses a 9V power rail, and the CV and gate signals are in the 0 to 9V range, where the Werkstatt is expecting a maximum CV of 5V. The regular CV output from the sequencer is also inverted, to match the response of the 555 IC in the sound generator.
To build this up, we'll need to following parts:
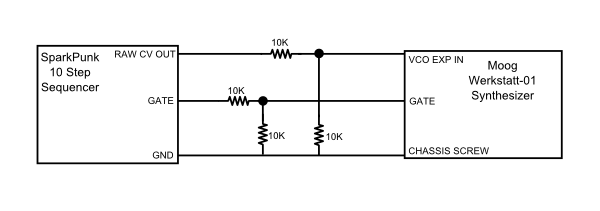
To interface the sequencer with the Werkstatt, we'll use a couple of voltage dividers, to reduce the 9V logic of the sequencer to 4.5V for the Werkstatt. The schematic looks like this
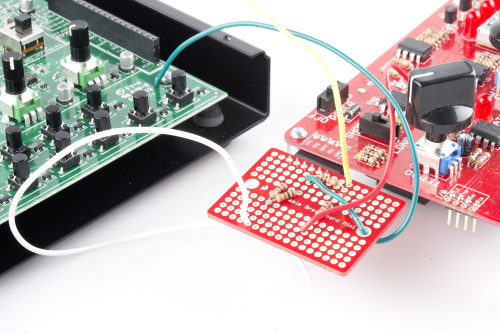
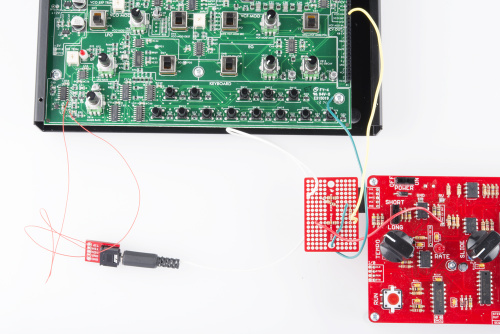
Starting with a Sequencer that had been completely built and tested, I soldered the header onto the bottom of the mini breadboard, keeping it near the top edge.
Then, we need to make sure both circuits have a common ground. I soldered a green wire to that row of the breadboard, and looped it around one of the chassis screws in the Werkstatt.
The noninverted CV from the sequencer is available at a solder pad marked RAW CV OUT, above the tempo indicator LED. I picked up that signal, attenuated it by half with a pair of 10K resistors, then ran a yellow wire to the VCO exp in input on the Werkstatt's pin header. I was using solid core hookup wire, which I was able to simply plug into the header on the Werkstatt.
I then did the same with the gate from the sequencer - a pair of 10K resistors as a divider, with a white wire and a 3.5mm plug to interface with the gate input.
Now the Sequencer drives the Werkstatt. The gate is driven by the sequencer, but the keys on the Werkstatt are still active, and we can use them to transpose the sequence as it runs!
MIDI to Control Voltage
While the octave of tact switches are compact, they aren't as convenient as actual piano-style keys, and only having one octave of them can be rather restrictive. I'm pretty sure the little switches are the lone reason that I'm unable to play "Lucky Man." So I jumped into adding a MIDI keyboard controller, using an Arduino-based MIDI-to-CV interpreter.
MIDI is a more modern digital interface that ~~superseded~~ replaced the CV/Gate standard. It uses a serial command protocol to transmit information about a musical performance between devices. In this case, we'll be building a bridge between a MIDI keyboard with full-sized piano keys to generate gate and CV signals for the Werkstatt.
In addition to those parts, of course, you'll need a MIDI controller keyboard - I borrowed an M-Audio Oxygen 49 from Miskatonic.
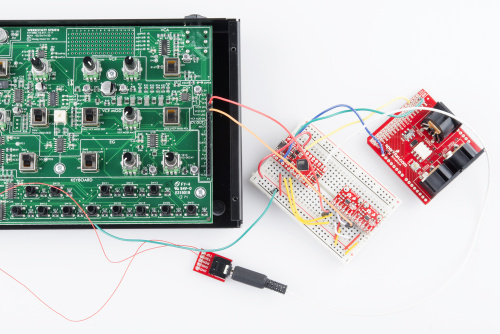
I selected the Pro-Micro because it has a hardware-based USB port for programming and debugging, which is independent of the UART serial port. I could hook the MIDI port to the TX and RX lines of the shield, and not have to worry about reconfiguring the hardware to load new firmware (or forgetting to switch it back when I'm done programming it!).
If you're familiar with MIDI and Arduino connections, the hookup is fairly straight forward.
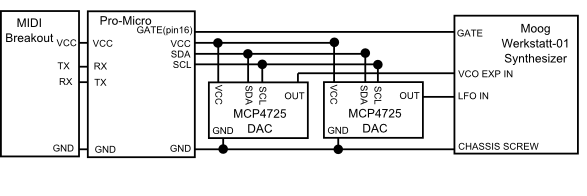
The connections look like this.
- Tie all of the board grounds together - MIDI breakout, Pro Micro, DACs and Werkstatt.
- The Pro-Micro was powered via the USB connection, which in turn powers MIDI and DAC boards.
- Tie VCC from the pro micro to VCC on the DACs and on the MIDI breakout.
- Tie the MIDI in data line from the breakout to the RX pin on the Pro Micro. You can optionally also tie the Pro Micro TX pin to the MIDI out pin on the breakout - though at the moment this application only receives, and doesn't transmit.
- Tie SDA from the pro micro (I/O pin 2) to SDA on both DACs.
- Tie SCL from the pro micro (I/O pin 3) to SCL on both DACs.
- The output pins from the DACs were tied to jumper wires, so they can be plugged into the CV inputs on the Werkstatt.
- Finally, pin 16 on the Pro Micro was wired to a 3.5mm plug, then connected to the gate input.
The one thing to note is that with two DACs, one needed to have the address jumper reconfigured. There's more information about configuring those boards in the MCPMCP4725 hookup guide.
I'm currently using the FortySevenEffects Arduino MIDI Library, which nicely wraps up the MIDI parsing. I've plugged in several callbacks - note on and off, pitch bend, and continuous controllers. So far, it seems to be stable, and working fairly well.
The firmware is posted to my GitHub account. Feel free to peruse it, though you'll doubtless start finding it isn't an entirely mature and fully-baked MIDI to CV device. As I warned above, this is a work in progress!
Stumbling Blocks
The first thing to be aware of is that I've been powering the microcontroller and converters from the USB port on my development PC. It's convenient while on my workbench, but not especially accurate or portable. I mesaure Vcc as being about 5.08 Volts, a touch high - and it's probaby different for other USB ports.
This voltage isn't particularly critical for the digital portions of the circuit - the components are specified to work at up to 5.5V. The hangup comes in when we look at the digital to analog conversion done by the DACs. They are 12-bit converters, and they use Vcc as the reference voltage. This means that it divides the power supply into 4096 steps (2^12), or 1.220 mV per bit. Ideally, this translates to a semitone being about 68 counts, or 83 mV.
But if the reference voltage changes, then the counts per semitone also changes. With a reference that's a bit high, the notes are a little farther apart than they should be. It's hard to tell over small intervals, but it's obviously out of tune if I try to jump two octaves. I've been trying to understand this in the spreadsheet that you can find in the GitHub repo - tell it the actual supply voltage, and it will calculate a lookup table for the MIDI note-number-to-DAC conversion.
So the real takeaway here: I need a more stable voltage reference for those DACs! Maybe someone in the Werkstatt comminuty has some ideas to help me over this hurdle.
The other hangup has been how to apply the second DAC. The first one needs to be for the pitch CV, but a second channel of CV can have many uses, each of which might vary a bit in the exact meaning and implementation. Someone more skilled on keys than I would probably want that second channel to represent the MIDI velocity, so that the synth can be patched to respond to how hard the keys are struck. I didn't find that to be very useful, so I instead mapped it to the modulation wheel (MIDI contonuous controller #1). From there, I can patch it into the VCF CV or the LFO rate CV inputs, both of which are good for musical expression.
Oh, and one last thing hits me: I'm still using omni-on MIDI reception. Note events on any MIDI channel get translated into note on/off commands. If you want to change that, its a parameter to the macro that instantiates the MIDI interface class.
Some Other Possibilities
Looking over the schematics, there are a few unused IC sections on the board. Most notable among these is U2-A and U2-C, an unused transconductance amplifier and its associated buffer. There is also U5-D, an unused stage of CD4066 analog switch. Both of these IC sections are conveniently located on the board with a number of adjacent solder pads. So not only are they unused, but they're fairly easy to access!
The transconcuctance amp is particularly useful - the other half of the chip is the VCA. We could possibly add a second VCA by duplicating the circuit around U2-B and U2-D. This might be just the ticket to make the mod-wheel CV more useful - we could use the wheel to control the amplitude of the LFO output.
D.S al Coda
I'm excited to see such a big name in the synthesizer world take a bold step into the world of DIY electronics. Publishing the schematics and asking people to poke around under the hood is almost unheard of in any traditional electronics manufacturing business, let alone a respected musical instrument manufacturer with a legacy like Moog Music.
I'm excited to be along for this ride. Stay tuned for my updates here and at Werkstatt Workshop!
