Enginursday: Gilfoyle's Bitcoin Price Alert
How the project for this Enginursday went from a very involved asset tracking project, to a motorized fly vise which, thanks to a stock error, is now replicating a joke from a TV show.
While this is a pretty simple project, it taught me a lot about how well the community came together to make the ESP8266 the phenomenon that it is today (give yourselves a round of applause).
If you're not familiar with Silicon Valley, it's a show here in the US that pokes fun at the culture of tech startups, which means occasionally the show takes aim at electronics hobbyists and DIYers. One of the main characters in particular, Bertram Gilfoyle, has become the show's DIY representation, doing things like reading the Arduino handbook and building his own server rack.
In the most recent episode, Gilfoyle created an alert on his computer to let him know when the price of Bitcoin moved below or above the threshold where mining for the cryptocurrency is no longer profitable, so he can turn his miner off/on remotely. The thing to note is that it's meant to annoy those around him – based on the skills of his character, he could just as easily have automated powering up and down the mining rig. Instead, he created a system that blares the metal song "You Suffer" by Napalm Death every time the price crosses that threshold. Part of the joke is that he leaves for an extended period of time without shutting down this system, knowing nobody in the office has the password to his computer. There are plenty of clips of on YouTube (fair warning: as it's an HBO show, there's HBO language in the clip).
This episode coincided nicely with me taking an extended period of time off to recover from knee surgery, and I felt it was a fitting project to replicate. Time was a factor here, as I had to finish and install is before leaving, but one of the perks of working at SparkFun is having a warehouse worth of supplies at your disposal. Taking this into account, I think this project can be done for much cheaper. I also believe this project could be done entirely on the ESP8266 Thing Dev Board, but the method I used leaves room for all sorts of customization (plus I love to feature the MP3 Trigger whenever possible). If there's enough demand, I'll try again with the stand-alone route.
Below is the shopping list I used for this project. It assumes you have a USB Micro B cable and ways of powering both the ESP8266 Thing Dev Board (if not just leaving it plugged into a computer, which has benefits) and the MP3 Trigger (if not, a 9V wall adapter works best for the Trigger). It does have the ability to run on battery power if you are so inclined.
- ESP8266 Thing Development Board
- MP3 Trigger
- Hamburger Mini Speaker
- WiFi Antenna
- One 40-pin male header set
- F/F Jumper Wires
- MicroSD card 16GB
Code
I'm not a great coder. Code I write is the digital equivalent of a Rube Goldberg Machine (and often doesn't work). So if possible, I use the magic that is the open source community. I've never worked with an API before, but I knew I needed one to get the current price of Bitcoin. In searching, I was able to find a very well-put-together Arduino library, which uses the CoinMarketCap API.
While I must admit some of it is still black magic to me, the examples and information allowed me to fairly easily figure out what I needed and what I didn't. In addition, the work that's gone into integrating the ESP8266 and ESP32 WiFi modules in Arduino is exceptional. I thought I was going to spend half my time piecing together code to get the board online, but after looking at the code from the example for the CoinMarketCap API Library, I found the library support has made things incredibly easy. If you haven't used the ESP8266 in Arduino before, you'll need to do some adding to the boards and libraries, but it's fairly straightforward. The majority of this code is based on the example code from the GitHub repository above. If you find it useful, I highly recommend donating to that coder as they're doing great work (I will be doing so shortly).
Here, provided without warranty, is the code for the project:
#include <CoinMarketCapApi.h>

 /*******************************************************************
    Bitcoin Threshold Alert Code
 *                                                                 *
     Sloppily thrown together by Pearce Melcher
 *                                                                 *
     The majority of this sketch is an example of getting ticker
     info from coinmarketcap.com written by Brian Lough.
 *                                                                 *
    Seriously, check out his work and consider donating
    at https://github.com/witnessmenow it's rather incredible.
 *******************************************************************/


 #include <ESP8266WiFi.h>
 #include <WiFiClientSecure.h>

 //------- Install From Library Manager -------
 #include <ArduinoJson.h>


 //------- Replace the following! ------
 char ssid[] = "SSID";       // your network SSID (name)
 char password[] = "Password";  // your network key


 float bc_val; //Where we'll put the value in USD for bitcoin when we get it.
 float bc_prev = 0; //Starting point for the previous value we've read.
 const float bc_thresh = 6920; //This sets the threshold for which we want to know when                                          Bitcoin passes (in USD)

 CMCTickerResponse response;

 WiFiClientSecure client;
 CoinMarketCapApi api(client);

 // CoinMarketCap's limit is "no more than 10 per minute"
 // Make sure to factor in if you are requesting more than one coin.
 unsigned long api_mtbs = 300000; //mean time between api requests
 unsigned long api_due_time = 0;

 void setup() {

   pinMode(13, OUTPUT);
   digitalWrite(13, HIGH);

   Serial.begin(115200);

   // Set WiFi to station mode and disconnect from an AP if it was Previously
   // connected
   WiFi.mode(WIFI_STA);
   WiFi.disconnect();
   delay(100);

   // Attempt to connect to Wifi network:
   Serial.print("Connecting Wifi: ");
   Serial.println(ssid);
   WiFi.begin(ssid, password);
   while (WiFi.status() != WL_CONNECTED) {
     Serial.print(".");
     delay(500);
   }
   Serial.println("");
   Serial.println("WiFi connected");
   Serial.println("IP address: ");
   IPAddress ip = WiFi.localIP();
   Serial.println(ip);
 }

 //Keeping the ticker code here because it's really awesome and I have the space.
 void printTickerData(String bitcoin) {
   Serial.println("---------------------------------");
   Serial.println("Getting ticker data for " + bitcoin);


   // Ticker unfortunately is not the symbol for some reason.
   // Go to CoinMarketCap.com and select the coin you would like to check
   // The ticker name makes up the last part of the URL
   // e.g: http://coinmarketcap.com/currencies/bitcoin/ , "bitcoin" is the ticker value

   // Currency is optional, so you can pass only ticker if you want.
   // Check out the currency drop down on CoinMarketCap.com to get available values
   response = api.GetTickerInfo(bitcoin, "$");
    if (response.error == "") {
     Serial.print("ID: ");
     Serial.println(response.id);
     Serial.print("Name: ");
     Serial.println(response.name);
     Serial.print("Symbol: ");
     Serial.println(response.symbol);

     Serial.print("Rank: ");
     Serial.println(response.rank);

     Serial.print("Price in USD: ");
     Serial.println(response.price_usd);
     Serial.print("Price in BTC: ");
     Serial.println(response.price_btc);

     Serial.print("24h Volume USD: ");
     Serial.println(response.volume_usd_24h);
     Serial.print("Market Cap USD: ");
     Serial.println(response.market_cap_usd);

     Serial.print("Available Supply: ");
     Serial.println(response.available_supply);
     Serial.print("Total Supply: ");
     Serial.println(response.total_supply);

     Serial.print("Percent Change 1h: ");
     Serial.println(response.percent_change_1h);
     Serial.print("Percent Change 24h: ");
     Serial.println(response.percent_change_24h);
     Serial.print("Percent Change 7d: ");
     Serial.println(response.percent_change_7d);
     Serial.print("Last Updated: ");
     Serial.println(response.last_updated);

     // These fields will not come back if you do not request a currency
     Serial.print("Price in requested currecy: ");
     Serial.println(response.price_currency);
     Serial.print("24h Volume in requested currency: ");
     Serial.println(response.volume_currency_24h);
     Serial.print("Market Cap in requested currency: ");
     Serial.println(response.market_cap_currency);


    } else {
     Serial.print("Error getting data: ");
     Serial.println(response.error);
   }
    Serial.println("---------------------------------");
 }

 void loop() {
   unsigned long timeNow = millis();
   if ((timeNow > api_due_time))  {
     printTickerData("bitcoin");
     api_due_time = timeNow + api_mtbs;
   }
   bc_val = (response.price_usd);
   //Going to write two statements to allow for a different sound clip to play for dropping        below and above the threshold.

   //Dropping below threshold.
   if ((bc_val < bc_thresh)
       && (bc_prev >= bc_thresh)) {
     digitalWrite(13, LOW);
     delay(100);
     digitalWrite(13, HIGH);
   }

   //Rising above threshold.
   if ((bc_val > bc_thresh)
       && (bc_prev <= bc_thresh)) {
     digitalWrite(13, LOW);
     delay(100);
     digitalWrite(13, HIGH);
   }
   bc_prev = bc_val;
   delay(300000);
 }
There's a big chunk of code that really doesn't need to be there, but I left it in from the example code because it's cool to see and I had the space, but also I feel it gives you a good reference point when trying to troubleshoot. There's obviously parts in there you will need to fill out yourself (not leaving my WiFi credentials in there), but it should be fairly simple.
After figuring out what to pull from the API library, I needed to set up a way for the system to know when the price dropped below the threshold, but also when it rose above it. Yet another benefit of working at SparkFun is that Shawn Hymel was able to explain it to me in terms similar to leading and falling edge, and we came up with a good set of code in the loop to trigger the MP3 during that moment.
The code checks for the price every five minutes and reacts accordingly, and adds to the annoying factor in that it might go off every five minutes, or it might not.
MP3 Trigger
The MP3 Trigger is one of the most plug-and-play experiences in SparkFun products. Formatting the SD card correctly (FAT32) and adding the MP3 with "001" in the title of the track will immediately give you the ability to play that track when the TRIG1 pin is pulled low from one of the GPIO pins on the ESP8266 Thing Dev Board. I chose pin 13, but any will work. Also, the code is such that you can add a separate track for each notification (rising and falling). I personally stuck to the example in Silicon Valley, bought the "Napalm Death" track on Amazon for $1.29, and used it for both notifications.
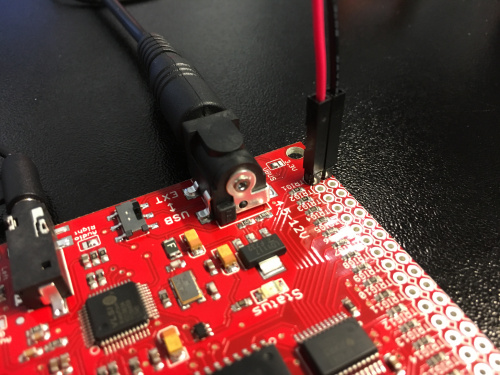
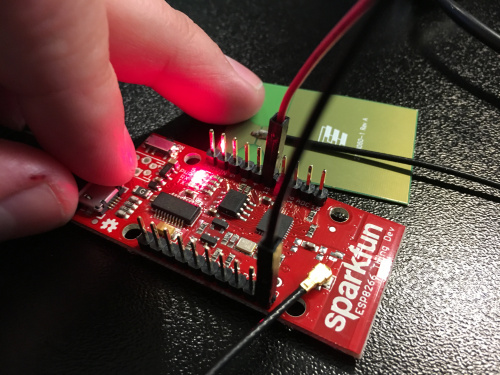
Putting everything together is pretty straightforward. I soldered the male pins to the TRIG1 pin set on the MP3 Trigger and on all the through-hole pins broken out on the Dev Board. This made the connection between the ESP8266 Thing Dev Board and the MP3 Trigger fairly simple, and only used two of the jumper wires as shown below.
Testing
One of the jokes in the show revolves around the fact that Bitcoin is volatile (which is why the alarm goes off frequently and unpredictably) – Silicon Valley is pretty accurate on details and this was one they were really accurate on. Because the initial value is set to zero, if the first value of Bitcoin is read to be over the threshold, it will trigger the track, which is a pretty good initial test, but I wanted to make sure it would work "in the wild." I changed the threshold value over and over, putting it right above or right below the current value of Bitcoin. Most times it would end up going the opposite direction it did before, but a few times I got lucky and it crossed my set threshold and triggered the track. That being said, I'm only 85 percent sure my test conclusions are correct, so if you see issues, please let me know in the comments below and I'll update the code the first chance I get.
So it's the night before I'm out of the office for an extended period of time. I just checked the price and it's about $24 over where I last set the threshold, so probably no alerts tonight. But then again, Bitcoin is volatile... Hopefully my coworkers enjoy the new addition to our workspace!
As I said before, if there's a demand, I'll try to make this happen using only the ESP8266 Thing Dev Board. Otherwise, hopefully the next post from me will be that asset-tracking project.


